Future Possibilities?
When suitable software and infrastructure becomes available it may be possible for B-Format audio to be delivered by broadcasters and be decoded in the home to provide Ambisonic options alongside 5.1 or stereo configurations as desired. A user could select the replay system that they are using from a menu and the decoder would then provide the suitable format to the system. For this to happen broadcasters would need to either manipulate current protocols, for example working within the the limits of the 6 channel AC-3 stream, or establish new standards where 10 channels of audio could be transmitted. Could 5.1 steams could be converted to B-Format before transmission and then decoded to produce desired formats at the other end? This could also facilitate the transmission of B-Format and 5.1 as well as opening up new opportunities for companies such as Dolby to make the most of expanding 5.1 - 7.1 or Pro Logic 11Z systems.
Even if we discount the possibility of transmission we could also offer users the option via DVD and game audio menus, download options via Apple TV or PS3 etc to choose which audio stream suits a playback system employed by the end user.
Whilst this is well beyond the scope of this project, these considerations could form the basis of future investigations into the use of techniques such as Binaural or Ambisonics to enhance visual sequences by providing immersive audio experiences in theaters, in the home or on the move.
This project has highlighted, through research involving literature and practical experimentation, that 'immersive' or enveloping soundtracks can perform better than conventional surround or stereo soundtracks when used to support visual sequences.
Creators of such content will begin to realise (as demonstrated by Dolby Labs) that there is definitely a market there, so therefore will, in time, need to respond to those demands. The two methods outlined in this project are only two of many, but I feel that they offer the best starting point from which we can begin to realise the potential that immersive sound has in enhancing visual sequences.
Monday 25 April 2011
Wednesday 20 April 2011
Preparing DVD
When preparing the delivery formats including DVD's, several processes needed to be undertaken. This brief summary outlines the necessary steps for creating the final piece.
Context: The final format DVD must be able to replay stereo, Binaural and 5.1 soundtracks depending on a users preference. A menu system must therefore be employed to allow the user to selet the most appropriate audio format. This is similar to the way that alternative languages or directors commentary's are selected on commercial DVD's.
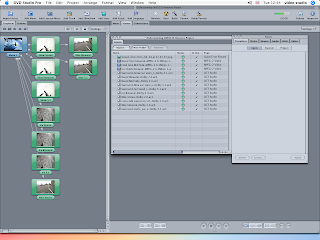
The first stage in the process is to encode all of the audio and video streams in order that DVD Studio Pro, which is the software used to burn the discs, can produce a suitable format that can be read by DVD players.
The encoding formats that I have chosen to use are MPEG-2 for the video as it supports the frame rates and aspect ratio of the material, and Dolby 2.0 AC-3 and Dolby 5.1 AC-3 which allows playback on almost all devices.
To encode the video and audio a programme called Compressor was used to convert the existing formats to the desired formats. An example of how the process of encoding is carried out in the application can be seen in the screen shot below.
When all of the video and audio streams have been converted the process of 'building' the DVD could begin. To compile the DVD a programme called DVD Studio Pro was used. This application allows the user to build menus and assign 'assets' to each of the menus. An 'asset' is a target piece of media such as a video or audio stream. An outline of the menu structure for this DVD can be seen in the screen shot below.
Menu System
With all assets, graphics and menus assigned all that is left to do is burn the DVD. Once the DVD was written it was tested prior to submission.
When suitable domestic Ambisonic decoders become commonplace then this option would be included on the DVD also. On the final DVD (as outlined above) only stereo, Binaural and 5.1 sondtracks have been included. A separate DVD containing the Ambisonic B-Format stems has been submitted. These will need to be imported into a DAW with suitable software and decoder in order to be suitably monitored.
Uses for a menu system
The menu system could give the viewer to select audio that suited their replay system instead of choosing the recording method used to provide the experience. For example, for viewers that were using a mobile technology (with headphones) could chose the option 'On the move' from the menu. This would be mapped to the Binaural or stereo soundtrack. For viewers watching using a laptop, or desktop computer could choose a similarly descriptive option and so on.
Context: The final format DVD must be able to replay stereo, Binaural and 5.1 soundtracks depending on a users preference. A menu system must therefore be employed to allow the user to selet the most appropriate audio format. This is similar to the way that alternative languages or directors commentary's are selected on commercial DVD's.
The first stage in the process is to encode all of the audio and video streams in order that DVD Studio Pro, which is the software used to burn the discs, can produce a suitable format that can be read by DVD players.
The encoding formats that I have chosen to use are MPEG-2 for the video as it supports the frame rates and aspect ratio of the material, and Dolby 2.0 AC-3 and Dolby 5.1 AC-3 which allows playback on almost all devices.
To encode the video and audio a programme called Compressor was used to convert the existing formats to the desired formats. An example of how the process of encoding is carried out in the application can be seen in the screen shot below.

When all of the video and audio streams have been converted the process of 'building' the DVD could begin. To compile the DVD a programme called DVD Studio Pro was used. This application allows the user to build menus and assign 'assets' to each of the menus. An 'asset' is a target piece of media such as a video or audio stream. An outline of the menu structure for this DVD can be seen in the screen shot below.
Menu System

With all assets, graphics and menus assigned all that is left to do is burn the DVD. Once the DVD was written it was tested prior to submission.
When suitable domestic Ambisonic decoders become commonplace then this option would be included on the DVD also. On the final DVD (as outlined above) only stereo, Binaural and 5.1 sondtracks have been included. A separate DVD containing the Ambisonic B-Format stems has been submitted. These will need to be imported into a DAW with suitable software and decoder in order to be suitably monitored.
Uses for a menu system
The menu system could give the viewer to select audio that suited their replay system instead of choosing the recording method used to provide the experience. For example, for viewers that were using a mobile technology (with headphones) could chose the option 'On the move' from the menu. This would be mapped to the Binaural or stereo soundtrack. For viewers watching using a laptop, or desktop computer could choose a similarly descriptive option and so on.
Monday 18 April 2011
Ambisonic replay systems
Ambisonic Playback Systems.
There are many potential variations of playback systems suitable for the replay of Ambisonic recordings. They can range from as little as four to as many speakers that a room could physically accommodate. The speakers can be arranged in a variety of ways, to either suit the layout of a space or a users preference. The distinct advantage that Ambisonic playback systems have over conventional set ups is that rather than relying on multiple phantom images being created between loudspeakers to create the surround experience, these systems use the loudspeaker as a means to generate wavefronts similar to those generated by the sound source at the recording stage. Put simply the loudspeakers work together to create a wavefront rather than a single multi-channel stem driving a single loudspeaker.
This means that if the number of loudspeakers, and their position is known, then the B-format sound files can employ the loudspeakers to re-create the wavefronts captured at the time of the recording by means of a suitable decoder.
The system that I will be using to replay the B-Format recordings made for this project is located in the Digital Design Studio in Glasgow. The Digital Design Studio is part of the Glasgow School of Art and is located in 'The Hub' near Pacific Quay. The Digital Design Studio system comprises 12 loudspeakers arranged in a format similar to the one seen here in this BBC video demonstrating their research into Ambisonics.
The speakers are arranged in groups of four: four to give planar information and a further 8 to provide the periphonic or height information (4 above and 4 below the X and Y axis)
When testing the recordings through this system I was amazed at how well it provided a really cohesive sounding environment. What this means is that I was unable to pinpoint the location of any one loudspeaker in respect of a sound emitting from it. The periphonic information that I had hoped to capture was most definitely present as I was able to easily locate sound sources accurately in all directions. Having tested out both the video and audio replay system I was confident that the listening tests would provide favourable results that would most certainly support the arguments outlined in my Dissertation and Reseach module.
Commercial Success?
If Ambisonic replay systems are ever to be employed outside of specialist facilities or the listening environments of enthusiasts, then the ITU, manufacturers of DSP software, manufacturers of replay equipment and such like must begin to develop or agree upon a set of standards which allows this exiting prospect the opportunity to develop further. Until this happens I suspect that this technology will remain dormant for several years to come. Can we draw parallels with the Nyquist Theorem in the 30's and its eventual adoption in the field of digital audio fifty years later? I hope not, otherwise we will have some years to wait before Ambisonics becomes common place. That is of course unless academics and practitioners keep making the arguments in favour of this technology, bringing it to the attention of the masses and manufacturers alike.
Sunday 17 April 2011
Video Editing Process 2
As I discussed in the previous Video Editing Post I was unable to export anything other than a stereo audio file from Final Cut Express. This would potentially have been very problematic if a suitable solution could not be sought as I needed to get the 4 channels of B-Format Audio and the 6 channels of 5.1 audio out of the application. One solution to this would have been to use Final Cut Pro to deal with the editing tasks but the only access I have to this software is at my place of work. This didn't suit my work-flow and getting access to the work station for periods long enough to complete the tasks would be too difficult. Instead I approached the problem by looking at the process differently...
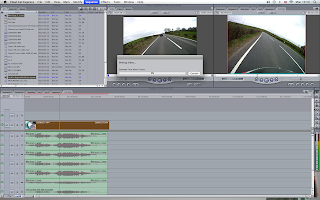
Rather than getting the audio ready first, for example in Logic before bringing it alongside the video in Final Cut, I would edit the video first then deal with the audio afterwards.
To achieve this a note was made of all the edit in and out points in Final Cut e.g. In: 00:01:05:07 - Out 00:04:00:00 and so on. The video and multi-channel audio streams were imported back into Logic 9 where each of these edits were applied.
Short cross fades were applied to each of the edit points before the streams were exported from Logic in a manner that could be used to create the DVD. This required exporting the files as non-interleaved surround files. This gave the files an appropriate recognisable extension for example .L .R .C .Ls .Rs .Lfe
The video and audio editing/exporting tasks were now complete.
Rather than getting the audio ready first, for example in Logic before bringing it alongside the video in Final Cut, I would edit the video first then deal with the audio afterwards.
To achieve this a note was made of all the edit in and out points in Final Cut e.g. In: 00:01:05:07 - Out 00:04:00:00 and so on. The video and multi-channel audio streams were imported back into Logic 9 where each of these edits were applied.

Short cross fades were applied to each of the edit points before the streams were exported from Logic in a manner that could be used to create the DVD. This required exporting the files as non-interleaved surround files. This gave the files an appropriate recognisable extension for example .L .R .C .Ls .Rs .Lfe
The video and audio editing/exporting tasks were now complete.
Video Editing Process
And so to embark on another new adventure... the complicated world of video editing.
With all of the audio now in a suitable form I could now begin the process of editing the video sequences. This would be another step closer to some of the practical aspects, outlined in the learning contract, being realised.
The processes involved in video editing, although vaguely similar to those used in audio, are in actual fact distinctly different. The similarities end with the concept of a time-line and some basic tools. The differences begin with the nuances of unfamiliar software packages and the plethora of output options for your carefully edited final videos. Just like Logic 9, I had identified this as a potential area that may be problematic and as such had laid plenty of time aside to ensure that I would remain within identified time scales and had identified resources that would help me with the processes required.
The software application that I had decided to use was Final Cut Express. This was within my budget for the project and as I was familiar with other Apple based software packages therefore it seemed like the logical choice. Also every where you look, it appears that this is the package of choice for many amateur film makers and professionals alike. Learning to use this application would undoubtedly benefit me in my own professional practice and in future projects.
Before embarking on the editing process I had carried out some research into practical uses of the software and of some technical considerations. Resources such as the Apple website offer a range of instructional videos and links to other training providers. Some of the free videos on offer from these third party providers are incredibly useful and provided me with a reasonable starting point.
Process
Once the basics of importing, editing and adding transitions between edits had been researched it seemed logical to go through the process from start to finish using as short sequence as an experiment. I needed to be able to get the video and audio into the application, perform some basic edits, get it out of the application and onto DVD. This process would highlight any potential problems that I might encounter.
This process worked well for the stereo audio streams but when it comes to exporting anything other than stereo Final Cut Express is not able to perform this task. This was potentially a major problem therefore a solution had to be sought. The solution to which I arrived is discussed in this post.
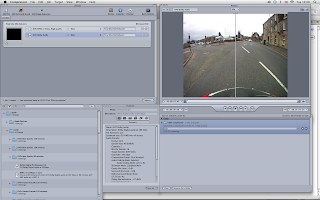
Final Edits
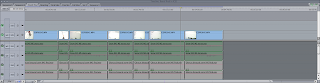
The quickest and simplest process for achieving the editing tasks quickly and efficiently was to identify the edit points using either Logic 9 or Pro Tools. This is because the video needs to be 'rendered' in Final Cut before it can be previewed along with the audio as opposed to being played directly from the source. Therefore in order to save huge amounts of time I only needed to render the sections that I knew I would need.
In this example you can see that to render 25 minutes of video would take approximately 3 hours.
As the edit points had been identified in Logic 9 I was able to perform the edits fairly quickly. To ensure that the multiple audio streams synced with the video simultaneous edits had to be performed on these also. For example the stereo sounds and the Binaural sounds had to be placed on the timeline alongside the video.
This would allow me to export multiple video sequences with the appropriate soundtracks by muting the tracks that I did not want.
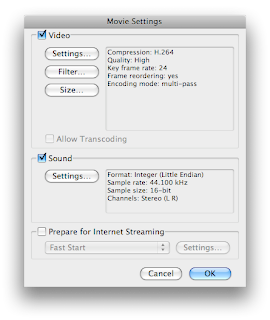
As part of the video exporting process I needed to establish what would be the best codec to use in order to get the highest quality video output. This required extensive experimentation with various compression formats (of which there are hundreds). I finally decided to go with H.264 as this would retain suitable quality for images that contained a lot of motion. It also conformed to the aspect ratio of the original footage, 4:3.
Once all video and audio streams had been exported the next step was to produce the DVD's.
With all of the audio now in a suitable form I could now begin the process of editing the video sequences. This would be another step closer to some of the practical aspects, outlined in the learning contract, being realised.
The processes involved in video editing, although vaguely similar to those used in audio, are in actual fact distinctly different. The similarities end with the concept of a time-line and some basic tools. The differences begin with the nuances of unfamiliar software packages and the plethora of output options for your carefully edited final videos. Just like Logic 9, I had identified this as a potential area that may be problematic and as such had laid plenty of time aside to ensure that I would remain within identified time scales and had identified resources that would help me with the processes required.
The software application that I had decided to use was Final Cut Express. This was within my budget for the project and as I was familiar with other Apple based software packages therefore it seemed like the logical choice. Also every where you look, it appears that this is the package of choice for many amateur film makers and professionals alike. Learning to use this application would undoubtedly benefit me in my own professional practice and in future projects.
Before embarking on the editing process I had carried out some research into practical uses of the software and of some technical considerations. Resources such as the Apple website offer a range of instructional videos and links to other training providers. Some of the free videos on offer from these third party providers are incredibly useful and provided me with a reasonable starting point.
Process
Once the basics of importing, editing and adding transitions between edits had been researched it seemed logical to go through the process from start to finish using as short sequence as an experiment. I needed to be able to get the video and audio into the application, perform some basic edits, get it out of the application and onto DVD. This process would highlight any potential problems that I might encounter.
This process worked well for the stereo audio streams but when it comes to exporting anything other than stereo Final Cut Express is not able to perform this task. This was potentially a major problem therefore a solution had to be sought. The solution to which I arrived is discussed in this post.
Final Edits
The quickest and simplest process for achieving the editing tasks quickly and efficiently was to identify the edit points using either Logic 9 or Pro Tools. This is because the video needs to be 'rendered' in Final Cut before it can be previewed along with the audio as opposed to being played directly from the source. Therefore in order to save huge amounts of time I only needed to render the sections that I knew I would need.
In this example you can see that to render 25 minutes of video would take approximately 3 hours.

As the edit points had been identified in Logic 9 I was able to perform the edits fairly quickly. To ensure that the multiple audio streams synced with the video simultaneous edits had to be performed on these also. For example the stereo sounds and the Binaural sounds had to be placed on the timeline alongside the video.

This would allow me to export multiple video sequences with the appropriate soundtracks by muting the tracks that I did not want.
As part of the video exporting process I needed to establish what would be the best codec to use in order to get the highest quality video output. This required extensive experimentation with various compression formats (of which there are hundreds). I finally decided to go with H.264 as this would retain suitable quality for images that contained a lot of motion. It also conformed to the aspect ratio of the original footage, 4:3.

Once all video and audio streams had been exported the next step was to produce the DVD's.
Thursday 14 April 2011
Standards and their impact on work-flow!
Problem Solving
Working between two post production environments has undoubtedly thrown up some problems relating to work flow. With one environment equipped with a full 5.1 monitoring system and the other with a 2-channel system, tasks needed to be scheduled to suit each environment where possible. However, it was not always possible to have the luxury of the 5.1 or Ambisonic system all the time and as a result some 'work arounds' had to be employed. For example, when editing multi-channel audio using only stereo monitoring, an element of reliance upon standards had to be employed. Once a series of tasks had been carried out they then needed to be double checked using the appropriate replay system and amendments made where required. This added a degree of complexity to an already complicated process.
Once I had a firm grasp of how the two environments differed I was able to ensure that consistent standards were adopted in each. I was then able to proceed with relative ease. With an extremely focused and organised approach I was able to carry the post production tasks successfully.
Problems with 'standards'
The problem with standards is that there are so many!!!!!
During the process of importing and exporting audio and video between several applications it became apparent that the way that each application interprets file types, file names and file extensions can be very different. I came across three very distinct differences when dealing with multichannel audio files. I would say at this stage that these are standards that need to be understood by users of these applications to avoid issues that can result in audio stems being directed to an incorrect loudspeaker or being misinterpreted by a plug-in.
Here are some examples of how these differences manifested themselves.
1. Pro Tools LE
When Pro Tools LE is presented with a 4 channel interleaved file, which in this case is a B-Format file, it interprets it as a Dolby Pro Logic File and appends the extensions accordingly. A Dolby Pro Logic file carries the extensions LCRS. This is fine when working in Pro Tools alone but the problems don't arise until you attempt to bring these into Logic 9. Dolby Pro Logic is an old 4 channel surround format not generally used any more. An explanation can be seen here:
2. Logic 9
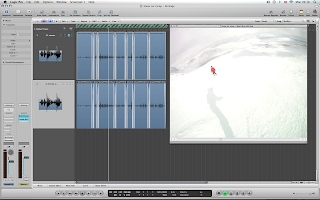
Logic 9 does not recognise files wit a '.S' extension and therefore when importing the files as a multichannel interleaved file it places it on what it feels is the correct stem. This is problematic because in order to transcode the B-Format audio into G-Format (5.1) the plug-in must be presented with the appropriate file and channel allocation. Although the channel allocation looks correct I couldn't be sure that the appropriate stems were on the correct channels.
Logic Channel Meter showing LCRS files on incorrect stems
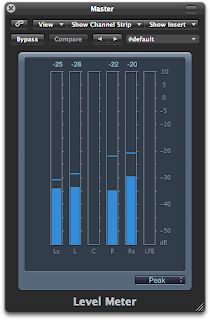
As we can see from the image above Logic is looking for L R Ls Rs files when importing a 4 channel interleaved file. I now had to establish the relationship between the two standards, i.e. what was the equivalent file extension for LCRS in relation to L R Ls Rs? To do this I quickly created 4 files in Pro Tools, 1 that contained audio and 3 that did not. This would allow me to see which stem it would be allocated in Logic. Through repeating this process of creating interleaved files with only 1 channel containing audio I was able to produce the following table:
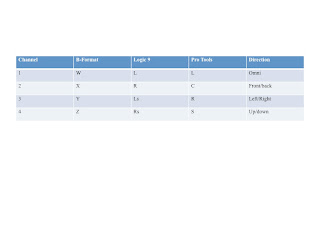
This table allowed me to keep track of the B-Format stems from the recording stage to the export stage. It has proved to be a very useful tool for keeping track of file names and extensions.
What I was now able to do was go back to Pro Tools, carry out the tasks that needed to be done there, rename the files according to the conventions in the table and confidently bring these into Logic for further processing.
3. B-Format to 5.1 (ITU 775 Standard)
With the channel allocation now correct I was able to convert the B-Format stems into a 5.1 file ready for editing alongside the video. To do this the B2G plug-in was used. This too brought about some initial confusion. When I first played back the audio there seemed to be some incorrect positional information that conflicted with the video, i.e. things were appearing from the wrong spatial locations. To ensure that the 5.1 file was a true spatial representation of the B-Format file then several steps had to be taken to ensure this was possible. Firstly Logic needed to be set-up to ensure that the correct stems were pointing at the appropriate speakers. As there are several options available it was decided that the ITU 775 standard should be used. If this standard was adopted throughout the process then I could be confident that channel allocation and eventual output were consistent.
Logic Preferences showing ITU channel allocation
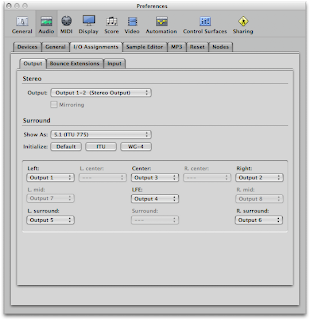
The next step was to ensure that the physical outputs from the Audio Interface were being routed to the appropriate speaker. This was checked visually. The final step was to test if the outputs on the plug-in were consistent with the ITU standard as there were three options available.
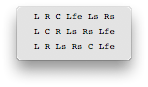
The first option proved to be the one. This is also consistent with the ITU/SMPTE standard track layout of 1 2 3 4 5 6 = L R C Lfe LS Rs.
This article by Bobby Owsinski provided some valuable track assignment information
Footnote...
The final element of confusion emerged when the 5.1 track was imported into Final Cut Express. FCE uses film standard track allocation of L R C Lf Ls Rs....but as I was not using FCE to handle the multi-channel audio I could forget about this for now....
Industry Standards and Regulations
Dolby 5.1 Channel Music Production Guidelines
During the process of importing and exporting audio and video between several applications it became apparent that the way that each application interprets file types, file names and file extensions can be very different. I came across three very distinct differences when dealing with multichannel audio files. I would say at this stage that these are standards that need to be understood by users of these applications to avoid issues that can result in audio stems being directed to an incorrect loudspeaker or being misinterpreted by a plug-in.
Here are some examples of how these differences manifested themselves.
1. Pro Tools LE
When Pro Tools LE is presented with a 4 channel interleaved file, which in this case is a B-Format file, it interprets it as a Dolby Pro Logic File and appends the extensions accordingly. A Dolby Pro Logic file carries the extensions LCRS. This is fine when working in Pro Tools alone but the problems don't arise until you attempt to bring these into Logic 9. Dolby Pro Logic is an old 4 channel surround format not generally used any more. An explanation can be seen here:
2. Logic 9
Logic 9 does not recognise files wit a '.S' extension and therefore when importing the files as a multichannel interleaved file it places it on what it feels is the correct stem. This is problematic because in order to transcode the B-Format audio into G-Format (5.1) the plug-in must be presented with the appropriate file and channel allocation. Although the channel allocation looks correct I couldn't be sure that the appropriate stems were on the correct channels.
Logic Channel Meter showing LCRS files on incorrect stems

As we can see from the image above Logic is looking for L R Ls Rs files when importing a 4 channel interleaved file. I now had to establish the relationship between the two standards, i.e. what was the equivalent file extension for LCRS in relation to L R Ls Rs? To do this I quickly created 4 files in Pro Tools, 1 that contained audio and 3 that did not. This would allow me to see which stem it would be allocated in Logic. Through repeating this process of creating interleaved files with only 1 channel containing audio I was able to produce the following table:

This table allowed me to keep track of the B-Format stems from the recording stage to the export stage. It has proved to be a very useful tool for keeping track of file names and extensions.
What I was now able to do was go back to Pro Tools, carry out the tasks that needed to be done there, rename the files according to the conventions in the table and confidently bring these into Logic for further processing.
3. B-Format to 5.1 (ITU 775 Standard)
With the channel allocation now correct I was able to convert the B-Format stems into a 5.1 file ready for editing alongside the video. To do this the B2G plug-in was used. This too brought about some initial confusion. When I first played back the audio there seemed to be some incorrect positional information that conflicted with the video, i.e. things were appearing from the wrong spatial locations. To ensure that the 5.1 file was a true spatial representation of the B-Format file then several steps had to be taken to ensure this was possible. Firstly Logic needed to be set-up to ensure that the correct stems were pointing at the appropriate speakers. As there are several options available it was decided that the ITU 775 standard should be used. If this standard was adopted throughout the process then I could be confident that channel allocation and eventual output were consistent.
Logic Preferences showing ITU channel allocation

The next step was to ensure that the physical outputs from the Audio Interface were being routed to the appropriate speaker. This was checked visually. The final step was to test if the outputs on the plug-in were consistent with the ITU standard as there were three options available.

The first option proved to be the one. This is also consistent with the ITU/SMPTE standard track layout of 1 2 3 4 5 6 = L R C Lfe LS Rs.
This article by Bobby Owsinski provided some valuable track assignment information
Footnote...
The final element of confusion emerged when the 5.1 track was imported into Final Cut Express. FCE uses film standard track allocation of L R C Lf Ls Rs....but as I was not using FCE to handle the multi-channel audio I could forget about this for now....
Industry Standards and Regulations
Dolby 5.1 Channel Music Production Guidelines
Subscribe to:
Posts (Atom)