Future Possibilities?
When suitable software and infrastructure becomes available it may be possible for B-Format audio to be delivered by broadcasters and be decoded in the home to provide Ambisonic options alongside 5.1 or stereo configurations as desired. A user could select the replay system that they are using from a menu and the decoder would then provide the suitable format to the system. For this to happen broadcasters would need to either manipulate current protocols, for example working within the the limits of the 6 channel AC-3 stream, or establish new standards where 10 channels of audio could be transmitted. Could 5.1 steams could be converted to B-Format before transmission and then decoded to produce desired formats at the other end? This could also facilitate the transmission of B-Format and 5.1 as well as opening up new opportunities for companies such as Dolby to make the most of expanding 5.1 - 7.1 or Pro Logic 11Z systems.
Even if we discount the possibility of transmission we could also offer users the option via DVD and game audio menus, download options via Apple TV or PS3 etc to choose which audio stream suits a playback system employed by the end user.
Whilst this is well beyond the scope of this project, these considerations could form the basis of future investigations into the use of techniques such as Binaural or Ambisonics to enhance visual sequences by providing immersive audio experiences in theaters, in the home or on the move.
This project has highlighted, through research involving literature and practical experimentation, that 'immersive' or enveloping soundtracks can perform better than conventional surround or stereo soundtracks when used to support visual sequences.
Creators of such content will begin to realise (as demonstrated by Dolby Labs) that there is definitely a market there, so therefore will, in time, need to respond to those demands. The two methods outlined in this project are only two of many, but I feel that they offer the best starting point from which we can begin to realise the potential that immersive sound has in enhancing visual sequences.
Monday, 25 April 2011
Wednesday, 20 April 2011
Preparing DVD
When preparing the delivery formats including DVD's, several processes needed to be undertaken. This brief summary outlines the necessary steps for creating the final piece.
Context: The final format DVD must be able to replay stereo, Binaural and 5.1 soundtracks depending on a users preference. A menu system must therefore be employed to allow the user to selet the most appropriate audio format. This is similar to the way that alternative languages or directors commentary's are selected on commercial DVD's.
The first stage in the process is to encode all of the audio and video streams in order that DVD Studio Pro, which is the software used to burn the discs, can produce a suitable format that can be read by DVD players.
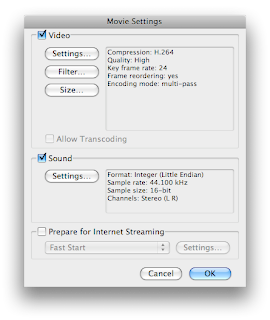
The encoding formats that I have chosen to use are MPEG-2 for the video as it supports the frame rates and aspect ratio of the material, and Dolby 2.0 AC-3 and Dolby 5.1 AC-3 which allows playback on almost all devices.
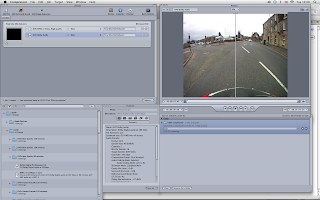
To encode the video and audio a programme called Compressor was used to convert the existing formats to the desired formats. An example of how the process of encoding is carried out in the application can be seen in the screen shot below.
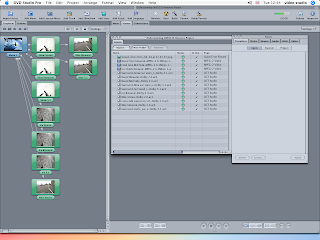
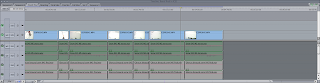
When all of the video and audio streams have been converted the process of 'building' the DVD could begin. To compile the DVD a programme called DVD Studio Pro was used. This application allows the user to build menus and assign 'assets' to each of the menus. An 'asset' is a target piece of media such as a video or audio stream. An outline of the menu structure for this DVD can be seen in the screen shot below.
Menu System
With all assets, graphics and menus assigned all that is left to do is burn the DVD. Once the DVD was written it was tested prior to submission.
When suitable domestic Ambisonic decoders become commonplace then this option would be included on the DVD also. On the final DVD (as outlined above) only stereo, Binaural and 5.1 sondtracks have been included. A separate DVD containing the Ambisonic B-Format stems has been submitted. These will need to be imported into a DAW with suitable software and decoder in order to be suitably monitored.
Uses for a menu system
The menu system could give the viewer to select audio that suited their replay system instead of choosing the recording method used to provide the experience. For example, for viewers that were using a mobile technology (with headphones) could chose the option 'On the move' from the menu. This would be mapped to the Binaural or stereo soundtrack. For viewers watching using a laptop, or desktop computer could choose a similarly descriptive option and so on.
Context: The final format DVD must be able to replay stereo, Binaural and 5.1 soundtracks depending on a users preference. A menu system must therefore be employed to allow the user to selet the most appropriate audio format. This is similar to the way that alternative languages or directors commentary's are selected on commercial DVD's.
The first stage in the process is to encode all of the audio and video streams in order that DVD Studio Pro, which is the software used to burn the discs, can produce a suitable format that can be read by DVD players.
The encoding formats that I have chosen to use are MPEG-2 for the video as it supports the frame rates and aspect ratio of the material, and Dolby 2.0 AC-3 and Dolby 5.1 AC-3 which allows playback on almost all devices.
To encode the video and audio a programme called Compressor was used to convert the existing formats to the desired formats. An example of how the process of encoding is carried out in the application can be seen in the screen shot below.

When all of the video and audio streams have been converted the process of 'building' the DVD could begin. To compile the DVD a programme called DVD Studio Pro was used. This application allows the user to build menus and assign 'assets' to each of the menus. An 'asset' is a target piece of media such as a video or audio stream. An outline of the menu structure for this DVD can be seen in the screen shot below.
Menu System

With all assets, graphics and menus assigned all that is left to do is burn the DVD. Once the DVD was written it was tested prior to submission.
When suitable domestic Ambisonic decoders become commonplace then this option would be included on the DVD also. On the final DVD (as outlined above) only stereo, Binaural and 5.1 sondtracks have been included. A separate DVD containing the Ambisonic B-Format stems has been submitted. These will need to be imported into a DAW with suitable software and decoder in order to be suitably monitored.
Uses for a menu system
The menu system could give the viewer to select audio that suited their replay system instead of choosing the recording method used to provide the experience. For example, for viewers that were using a mobile technology (with headphones) could chose the option 'On the move' from the menu. This would be mapped to the Binaural or stereo soundtrack. For viewers watching using a laptop, or desktop computer could choose a similarly descriptive option and so on.
Monday, 18 April 2011
Ambisonic replay systems
Ambisonic Playback Systems.
There are many potential variations of playback systems suitable for the replay of Ambisonic recordings. They can range from as little as four to as many speakers that a room could physically accommodate. The speakers can be arranged in a variety of ways, to either suit the layout of a space or a users preference. The distinct advantage that Ambisonic playback systems have over conventional set ups is that rather than relying on multiple phantom images being created between loudspeakers to create the surround experience, these systems use the loudspeaker as a means to generate wavefronts similar to those generated by the sound source at the recording stage. Put simply the loudspeakers work together to create a wavefront rather than a single multi-channel stem driving a single loudspeaker.
This means that if the number of loudspeakers, and their position is known, then the B-format sound files can employ the loudspeakers to re-create the wavefronts captured at the time of the recording by means of a suitable decoder.
The system that I will be using to replay the B-Format recordings made for this project is located in the Digital Design Studio in Glasgow. The Digital Design Studio is part of the Glasgow School of Art and is located in 'The Hub' near Pacific Quay. The Digital Design Studio system comprises 12 loudspeakers arranged in a format similar to the one seen here in this BBC video demonstrating their research into Ambisonics.
The speakers are arranged in groups of four: four to give planar information and a further 8 to provide the periphonic or height information (4 above and 4 below the X and Y axis)
When testing the recordings through this system I was amazed at how well it provided a really cohesive sounding environment. What this means is that I was unable to pinpoint the location of any one loudspeaker in respect of a sound emitting from it. The periphonic information that I had hoped to capture was most definitely present as I was able to easily locate sound sources accurately in all directions. Having tested out both the video and audio replay system I was confident that the listening tests would provide favourable results that would most certainly support the arguments outlined in my Dissertation and Reseach module.
Commercial Success?
If Ambisonic replay systems are ever to be employed outside of specialist facilities or the listening environments of enthusiasts, then the ITU, manufacturers of DSP software, manufacturers of replay equipment and such like must begin to develop or agree upon a set of standards which allows this exiting prospect the opportunity to develop further. Until this happens I suspect that this technology will remain dormant for several years to come. Can we draw parallels with the Nyquist Theorem in the 30's and its eventual adoption in the field of digital audio fifty years later? I hope not, otherwise we will have some years to wait before Ambisonics becomes common place. That is of course unless academics and practitioners keep making the arguments in favour of this technology, bringing it to the attention of the masses and manufacturers alike.
Sunday, 17 April 2011
Video Editing Process 2
As I discussed in the previous Video Editing Post I was unable to export anything other than a stereo audio file from Final Cut Express. This would potentially have been very problematic if a suitable solution could not be sought as I needed to get the 4 channels of B-Format Audio and the 6 channels of 5.1 audio out of the application. One solution to this would have been to use Final Cut Pro to deal with the editing tasks but the only access I have to this software is at my place of work. This didn't suit my work-flow and getting access to the work station for periods long enough to complete the tasks would be too difficult. Instead I approached the problem by looking at the process differently...
Rather than getting the audio ready first, for example in Logic before bringing it alongside the video in Final Cut, I would edit the video first then deal with the audio afterwards.
To achieve this a note was made of all the edit in and out points in Final Cut e.g. In: 00:01:05:07 - Out 00:04:00:00 and so on. The video and multi-channel audio streams were imported back into Logic 9 where each of these edits were applied.
Short cross fades were applied to each of the edit points before the streams were exported from Logic in a manner that could be used to create the DVD. This required exporting the files as non-interleaved surround files. This gave the files an appropriate recognisable extension for example .L .R .C .Ls .Rs .Lfe
The video and audio editing/exporting tasks were now complete.
Rather than getting the audio ready first, for example in Logic before bringing it alongside the video in Final Cut, I would edit the video first then deal with the audio afterwards.
To achieve this a note was made of all the edit in and out points in Final Cut e.g. In: 00:01:05:07 - Out 00:04:00:00 and so on. The video and multi-channel audio streams were imported back into Logic 9 where each of these edits were applied.

Short cross fades were applied to each of the edit points before the streams were exported from Logic in a manner that could be used to create the DVD. This required exporting the files as non-interleaved surround files. This gave the files an appropriate recognisable extension for example .L .R .C .Ls .Rs .Lfe
The video and audio editing/exporting tasks were now complete.
Video Editing Process
And so to embark on another new adventure... the complicated world of video editing.
With all of the audio now in a suitable form I could now begin the process of editing the video sequences. This would be another step closer to some of the practical aspects, outlined in the learning contract, being realised.
The processes involved in video editing, although vaguely similar to those used in audio, are in actual fact distinctly different. The similarities end with the concept of a time-line and some basic tools. The differences begin with the nuances of unfamiliar software packages and the plethora of output options for your carefully edited final videos. Just like Logic 9, I had identified this as a potential area that may be problematic and as such had laid plenty of time aside to ensure that I would remain within identified time scales and had identified resources that would help me with the processes required.
The software application that I had decided to use was Final Cut Express. This was within my budget for the project and as I was familiar with other Apple based software packages therefore it seemed like the logical choice. Also every where you look, it appears that this is the package of choice for many amateur film makers and professionals alike. Learning to use this application would undoubtedly benefit me in my own professional practice and in future projects.
Before embarking on the editing process I had carried out some research into practical uses of the software and of some technical considerations. Resources such as the Apple website offer a range of instructional videos and links to other training providers. Some of the free videos on offer from these third party providers are incredibly useful and provided me with a reasonable starting point.
Process
Once the basics of importing, editing and adding transitions between edits had been researched it seemed logical to go through the process from start to finish using as short sequence as an experiment. I needed to be able to get the video and audio into the application, perform some basic edits, get it out of the application and onto DVD. This process would highlight any potential problems that I might encounter.
This process worked well for the stereo audio streams but when it comes to exporting anything other than stereo Final Cut Express is not able to perform this task. This was potentially a major problem therefore a solution had to be sought. The solution to which I arrived is discussed in this post.
Final Edits
The quickest and simplest process for achieving the editing tasks quickly and efficiently was to identify the edit points using either Logic 9 or Pro Tools. This is because the video needs to be 'rendered' in Final Cut before it can be previewed along with the audio as opposed to being played directly from the source. Therefore in order to save huge amounts of time I only needed to render the sections that I knew I would need.
In this example you can see that to render 25 minutes of video would take approximately 3 hours.
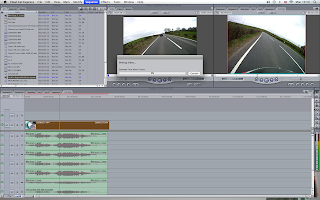
As the edit points had been identified in Logic 9 I was able to perform the edits fairly quickly. To ensure that the multiple audio streams synced with the video simultaneous edits had to be performed on these also. For example the stereo sounds and the Binaural sounds had to be placed on the timeline alongside the video.
This would allow me to export multiple video sequences with the appropriate soundtracks by muting the tracks that I did not want.
As part of the video exporting process I needed to establish what would be the best codec to use in order to get the highest quality video output. This required extensive experimentation with various compression formats (of which there are hundreds). I finally decided to go with H.264 as this would retain suitable quality for images that contained a lot of motion. It also conformed to the aspect ratio of the original footage, 4:3.
Once all video and audio streams had been exported the next step was to produce the DVD's.
With all of the audio now in a suitable form I could now begin the process of editing the video sequences. This would be another step closer to some of the practical aspects, outlined in the learning contract, being realised.
The processes involved in video editing, although vaguely similar to those used in audio, are in actual fact distinctly different. The similarities end with the concept of a time-line and some basic tools. The differences begin with the nuances of unfamiliar software packages and the plethora of output options for your carefully edited final videos. Just like Logic 9, I had identified this as a potential area that may be problematic and as such had laid plenty of time aside to ensure that I would remain within identified time scales and had identified resources that would help me with the processes required.
The software application that I had decided to use was Final Cut Express. This was within my budget for the project and as I was familiar with other Apple based software packages therefore it seemed like the logical choice. Also every where you look, it appears that this is the package of choice for many amateur film makers and professionals alike. Learning to use this application would undoubtedly benefit me in my own professional practice and in future projects.
Before embarking on the editing process I had carried out some research into practical uses of the software and of some technical considerations. Resources such as the Apple website offer a range of instructional videos and links to other training providers. Some of the free videos on offer from these third party providers are incredibly useful and provided me with a reasonable starting point.
Process
Once the basics of importing, editing and adding transitions between edits had been researched it seemed logical to go through the process from start to finish using as short sequence as an experiment. I needed to be able to get the video and audio into the application, perform some basic edits, get it out of the application and onto DVD. This process would highlight any potential problems that I might encounter.
This process worked well for the stereo audio streams but when it comes to exporting anything other than stereo Final Cut Express is not able to perform this task. This was potentially a major problem therefore a solution had to be sought. The solution to which I arrived is discussed in this post.
Final Edits
The quickest and simplest process for achieving the editing tasks quickly and efficiently was to identify the edit points using either Logic 9 or Pro Tools. This is because the video needs to be 'rendered' in Final Cut before it can be previewed along with the audio as opposed to being played directly from the source. Therefore in order to save huge amounts of time I only needed to render the sections that I knew I would need.
In this example you can see that to render 25 minutes of video would take approximately 3 hours.

As the edit points had been identified in Logic 9 I was able to perform the edits fairly quickly. To ensure that the multiple audio streams synced with the video simultaneous edits had to be performed on these also. For example the stereo sounds and the Binaural sounds had to be placed on the timeline alongside the video.

This would allow me to export multiple video sequences with the appropriate soundtracks by muting the tracks that I did not want.
As part of the video exporting process I needed to establish what would be the best codec to use in order to get the highest quality video output. This required extensive experimentation with various compression formats (of which there are hundreds). I finally decided to go with H.264 as this would retain suitable quality for images that contained a lot of motion. It also conformed to the aspect ratio of the original footage, 4:3.

Once all video and audio streams had been exported the next step was to produce the DVD's.
Thursday, 14 April 2011
Standards and their impact on work-flow!
Problem Solving
Working between two post production environments has undoubtedly thrown up some problems relating to work flow. With one environment equipped with a full 5.1 monitoring system and the other with a 2-channel system, tasks needed to be scheduled to suit each environment where possible. However, it was not always possible to have the luxury of the 5.1 or Ambisonic system all the time and as a result some 'work arounds' had to be employed. For example, when editing multi-channel audio using only stereo monitoring, an element of reliance upon standards had to be employed. Once a series of tasks had been carried out they then needed to be double checked using the appropriate replay system and amendments made where required. This added a degree of complexity to an already complicated process.
Once I had a firm grasp of how the two environments differed I was able to ensure that consistent standards were adopted in each. I was then able to proceed with relative ease. With an extremely focused and organised approach I was able to carry the post production tasks successfully.
Problems with 'standards'
The problem with standards is that there are so many!!!!!
During the process of importing and exporting audio and video between several applications it became apparent that the way that each application interprets file types, file names and file extensions can be very different. I came across three very distinct differences when dealing with multichannel audio files. I would say at this stage that these are standards that need to be understood by users of these applications to avoid issues that can result in audio stems being directed to an incorrect loudspeaker or being misinterpreted by a plug-in.
Here are some examples of how these differences manifested themselves.
1. Pro Tools LE
When Pro Tools LE is presented with a 4 channel interleaved file, which in this case is a B-Format file, it interprets it as a Dolby Pro Logic File and appends the extensions accordingly. A Dolby Pro Logic file carries the extensions LCRS. This is fine when working in Pro Tools alone but the problems don't arise until you attempt to bring these into Logic 9. Dolby Pro Logic is an old 4 channel surround format not generally used any more. An explanation can be seen here:
2. Logic 9
Logic 9 does not recognise files wit a '.S' extension and therefore when importing the files as a multichannel interleaved file it places it on what it feels is the correct stem. This is problematic because in order to transcode the B-Format audio into G-Format (5.1) the plug-in must be presented with the appropriate file and channel allocation. Although the channel allocation looks correct I couldn't be sure that the appropriate stems were on the correct channels.
Logic Channel Meter showing LCRS files on incorrect stems
As we can see from the image above Logic is looking for L R Ls Rs files when importing a 4 channel interleaved file. I now had to establish the relationship between the two standards, i.e. what was the equivalent file extension for LCRS in relation to L R Ls Rs? To do this I quickly created 4 files in Pro Tools, 1 that contained audio and 3 that did not. This would allow me to see which stem it would be allocated in Logic. Through repeating this process of creating interleaved files with only 1 channel containing audio I was able to produce the following table:
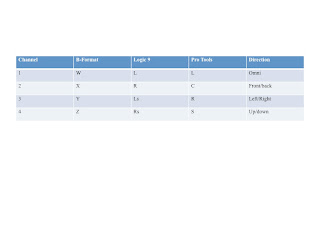
This table allowed me to keep track of the B-Format stems from the recording stage to the export stage. It has proved to be a very useful tool for keeping track of file names and extensions.
What I was now able to do was go back to Pro Tools, carry out the tasks that needed to be done there, rename the files according to the conventions in the table and confidently bring these into Logic for further processing.
3. B-Format to 5.1 (ITU 775 Standard)
With the channel allocation now correct I was able to convert the B-Format stems into a 5.1 file ready for editing alongside the video. To do this the B2G plug-in was used. This too brought about some initial confusion. When I first played back the audio there seemed to be some incorrect positional information that conflicted with the video, i.e. things were appearing from the wrong spatial locations. To ensure that the 5.1 file was a true spatial representation of the B-Format file then several steps had to be taken to ensure this was possible. Firstly Logic needed to be set-up to ensure that the correct stems were pointing at the appropriate speakers. As there are several options available it was decided that the ITU 775 standard should be used. If this standard was adopted throughout the process then I could be confident that channel allocation and eventual output were consistent.
Logic Preferences showing ITU channel allocation
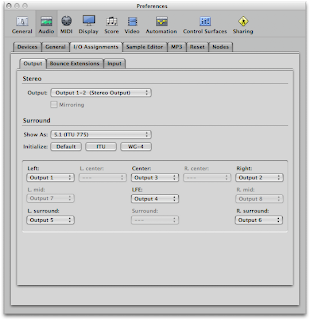
The next step was to ensure that the physical outputs from the Audio Interface were being routed to the appropriate speaker. This was checked visually. The final step was to test if the outputs on the plug-in were consistent with the ITU standard as there were three options available.
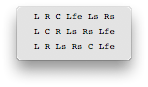
The first option proved to be the one. This is also consistent with the ITU/SMPTE standard track layout of 1 2 3 4 5 6 = L R C Lfe LS Rs.
This article by Bobby Owsinski provided some valuable track assignment information
Footnote...
The final element of confusion emerged when the 5.1 track was imported into Final Cut Express. FCE uses film standard track allocation of L R C Lf Ls Rs....but as I was not using FCE to handle the multi-channel audio I could forget about this for now....
Industry Standards and Regulations
Dolby 5.1 Channel Music Production Guidelines
During the process of importing and exporting audio and video between several applications it became apparent that the way that each application interprets file types, file names and file extensions can be very different. I came across three very distinct differences when dealing with multichannel audio files. I would say at this stage that these are standards that need to be understood by users of these applications to avoid issues that can result in audio stems being directed to an incorrect loudspeaker or being misinterpreted by a plug-in.
Here are some examples of how these differences manifested themselves.
1. Pro Tools LE
When Pro Tools LE is presented with a 4 channel interleaved file, which in this case is a B-Format file, it interprets it as a Dolby Pro Logic File and appends the extensions accordingly. A Dolby Pro Logic file carries the extensions LCRS. This is fine when working in Pro Tools alone but the problems don't arise until you attempt to bring these into Logic 9. Dolby Pro Logic is an old 4 channel surround format not generally used any more. An explanation can be seen here:
2. Logic 9
Logic 9 does not recognise files wit a '.S' extension and therefore when importing the files as a multichannel interleaved file it places it on what it feels is the correct stem. This is problematic because in order to transcode the B-Format audio into G-Format (5.1) the plug-in must be presented with the appropriate file and channel allocation. Although the channel allocation looks correct I couldn't be sure that the appropriate stems were on the correct channels.
Logic Channel Meter showing LCRS files on incorrect stems

As we can see from the image above Logic is looking for L R Ls Rs files when importing a 4 channel interleaved file. I now had to establish the relationship between the two standards, i.e. what was the equivalent file extension for LCRS in relation to L R Ls Rs? To do this I quickly created 4 files in Pro Tools, 1 that contained audio and 3 that did not. This would allow me to see which stem it would be allocated in Logic. Through repeating this process of creating interleaved files with only 1 channel containing audio I was able to produce the following table:

This table allowed me to keep track of the B-Format stems from the recording stage to the export stage. It has proved to be a very useful tool for keeping track of file names and extensions.
What I was now able to do was go back to Pro Tools, carry out the tasks that needed to be done there, rename the files according to the conventions in the table and confidently bring these into Logic for further processing.
3. B-Format to 5.1 (ITU 775 Standard)
With the channel allocation now correct I was able to convert the B-Format stems into a 5.1 file ready for editing alongside the video. To do this the B2G plug-in was used. This too brought about some initial confusion. When I first played back the audio there seemed to be some incorrect positional information that conflicted with the video, i.e. things were appearing from the wrong spatial locations. To ensure that the 5.1 file was a true spatial representation of the B-Format file then several steps had to be taken to ensure this was possible. Firstly Logic needed to be set-up to ensure that the correct stems were pointing at the appropriate speakers. As there are several options available it was decided that the ITU 775 standard should be used. If this standard was adopted throughout the process then I could be confident that channel allocation and eventual output were consistent.
Logic Preferences showing ITU channel allocation

The next step was to ensure that the physical outputs from the Audio Interface were being routed to the appropriate speaker. This was checked visually. The final step was to test if the outputs on the plug-in were consistent with the ITU standard as there were three options available.

The first option proved to be the one. This is also consistent with the ITU/SMPTE standard track layout of 1 2 3 4 5 6 = L R C Lfe LS Rs.
This article by Bobby Owsinski provided some valuable track assignment information
Footnote...
The final element of confusion emerged when the 5.1 track was imported into Final Cut Express. FCE uses film standard track allocation of L R C Lf Ls Rs....but as I was not using FCE to handle the multi-channel audio I could forget about this for now....
Industry Standards and Regulations
Dolby 5.1 Channel Music Production Guidelines
Pre - Video Editing Process
Audio Processes
Once all the recording sessions had taken place it was time to prepare the audio and video for editing. The process of aligning the audio to the video is a fairly straight forward one but the fact that the audio existed on various devices and in different formats posed some challenges. These challenges were overcome by adopting creative approaches to monitoring audio and file handling. The audio for each session (bike, snow and ice) was recorded to devices including a Roland portable stereo recorder and an Edirol R4 4 track field recorder. The recorded formats were stereo and B-Format. From these two formats it was necessary to produce 4 individual formats that could be edited alongside the video using Final Cut Pro/Express. These formats were stereo, Binaural, 5.1 and B-format.
The stereo, 5.1 and B-format stems would be derived from the recordings made using the Soundfield microphone and Edirol recorder. The Binaural stem would be taken from the Roland stereo recorder.
Pro Tools
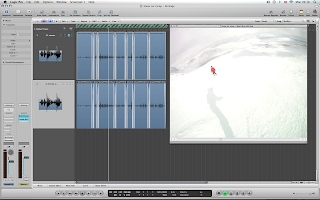
Pro Tools was used to sync all audio and video before any further processes were applied. The video and audio from the camera were imported into the software as and were used as a reference point only. The audio from each device was then imported into the session ready to be synced. Before the B-Format audio could be synchronised a Mid-Side signal had to be extracted from the B-Format stems. The raw B-Format stems were then grouped with the Mid-Side channels and muted (turned off) so that they could be edited but not heard. B-Format audio needs to be processed in one way or another to allow it to be monitored accurately, so in this case the Mid-Side would act as the decode.

This image shows the Mid-Side audio stems and the B-Format stems. As these tracks were 'grouped' together any edits applied to one would be applied to the other. So by using the Mid-Side stems to monitor the audio I was able to move both simultaneously to get them to line up with the video. The audio was lined up using a series of claps at the beginning of the video. This technique is identical to the clapper board used in film. Due to the huge amount of audio and video generated organisation was crucial. At the head of each take a 'slate' would be put down to identify each audio and video sequence. For example, once all audio and video recorders were running I would describe where and when the take was taking place before clapping 5 or 6 times to provide suitable sync points. This proved to be invaluable in the studio when syncing the audio.
The next stage of the process was to 'consolidate' all of the audio files to ensure that they all had an absolute starting point of zero seconds. This would allow the separate audio and video streams to be moved between various software applications for processing and conversion without the risk of them becoming out of sync with each other. Each audio file had to be renamed and appended with the appropriate extension before being exported from the application. For example, if the video was called GoPro 045 then each audio file would carry the same 045 identifier. Again this was another extremely efficient work flow solution to a potentially messy problem.

Adobe Audition
Now that all of the audio had been synchronised I could now use Adobe Audition to clean up any erroneous noises in the recordings. Audition is one of the few audio editing programmes that has a spectral analyser which allows changes in the audio spectrum to be applied through the use of an eraser and pencil etc. This very versatile programme was used to clean up some of the snow and bike audio. The file handling process was the same as described above. The process of cleaning up the audio was the same as discussed in an earlier post
Logic Pro
The next stage of the process was to take all of the clean and consolidated audio into Logic Pro for the final processing stage. The reason that this third piece of audio software was required was that it offered additional functionality not available in my preferred software application Pro Tools. Although similar to some degree I had to quickly grasp the work flow requirements of Logic Audio. This meant spending several hours acquainting myself with the menu structure and additional functionality that this package offered.
Logic was used to produce the 5.1 stems from the B-Format recordings as well as carrying out some equalisation, post Binaural processing and stereo to 5.1 up mixing. The fact that the audio was moving between various applications brought about some other unforeseen problems. These mainly related to file naming conventions and behaviors that were specific to the applications themselves. These problems and how they were addressed will be discussed in the 'Problem with standards post'.
The B-Format to 5.1 conversion was carried out using some free ware plugins produced by Danielle Courville . This suite of plug-ins is a fantastic resource for anyone working with B-Format content. The plug-in that I had initially identified to carry out this task had a license which subsequently expired and therefore forced me to use these instead. As it turned out this proved to be a happy accident as some of the other plug-ins from the suite will be used further down the line for replay etc. The plug-in used to create the 5.1 stems was the B2G. The plug-in took a little time to get used to in terms of the various output options available. Again some of the problems thrown up by these options will be discussed in the 'Problem with standards post'
B2G Plug-In

Ready to Edit
With all of the audio streams now processed I can now begin the task of editing the video and multiple audio streams in Final Cut Express.
Once all the recording sessions had taken place it was time to prepare the audio and video for editing. The process of aligning the audio to the video is a fairly straight forward one but the fact that the audio existed on various devices and in different formats posed some challenges. These challenges were overcome by adopting creative approaches to monitoring audio and file handling. The audio for each session (bike, snow and ice) was recorded to devices including a Roland portable stereo recorder and an Edirol R4 4 track field recorder. The recorded formats were stereo and B-Format. From these two formats it was necessary to produce 4 individual formats that could be edited alongside the video using Final Cut Pro/Express. These formats were stereo, Binaural, 5.1 and B-format.
The stereo, 5.1 and B-format stems would be derived from the recordings made using the Soundfield microphone and Edirol recorder. The Binaural stem would be taken from the Roland stereo recorder.
Pro Tools
Pro Tools was used to sync all audio and video before any further processes were applied. The video and audio from the camera were imported into the software as and were used as a reference point only. The audio from each device was then imported into the session ready to be synced. Before the B-Format audio could be synchronised a Mid-Side signal had to be extracted from the B-Format stems. The raw B-Format stems were then grouped with the Mid-Side channels and muted (turned off) so that they could be edited but not heard. B-Format audio needs to be processed in one way or another to allow it to be monitored accurately, so in this case the Mid-Side would act as the decode.

This image shows the Mid-Side audio stems and the B-Format stems. As these tracks were 'grouped' together any edits applied to one would be applied to the other. So by using the Mid-Side stems to monitor the audio I was able to move both simultaneously to get them to line up with the video. The audio was lined up using a series of claps at the beginning of the video. This technique is identical to the clapper board used in film. Due to the huge amount of audio and video generated organisation was crucial. At the head of each take a 'slate' would be put down to identify each audio and video sequence. For example, once all audio and video recorders were running I would describe where and when the take was taking place before clapping 5 or 6 times to provide suitable sync points. This proved to be invaluable in the studio when syncing the audio.
The next stage of the process was to 'consolidate' all of the audio files to ensure that they all had an absolute starting point of zero seconds. This would allow the separate audio and video streams to be moved between various software applications for processing and conversion without the risk of them becoming out of sync with each other. Each audio file had to be renamed and appended with the appropriate extension before being exported from the application. For example, if the video was called GoPro 045 then each audio file would carry the same 045 identifier. Again this was another extremely efficient work flow solution to a potentially messy problem.

Adobe Audition
Now that all of the audio had been synchronised I could now use Adobe Audition to clean up any erroneous noises in the recordings. Audition is one of the few audio editing programmes that has a spectral analyser which allows changes in the audio spectrum to be applied through the use of an eraser and pencil etc. This very versatile programme was used to clean up some of the snow and bike audio. The file handling process was the same as described above. The process of cleaning up the audio was the same as discussed in an earlier post
Logic Pro
The next stage of the process was to take all of the clean and consolidated audio into Logic Pro for the final processing stage. The reason that this third piece of audio software was required was that it offered additional functionality not available in my preferred software application Pro Tools. Although similar to some degree I had to quickly grasp the work flow requirements of Logic Audio. This meant spending several hours acquainting myself with the menu structure and additional functionality that this package offered.
Logic was used to produce the 5.1 stems from the B-Format recordings as well as carrying out some equalisation, post Binaural processing and stereo to 5.1 up mixing. The fact that the audio was moving between various applications brought about some other unforeseen problems. These mainly related to file naming conventions and behaviors that were specific to the applications themselves. These problems and how they were addressed will be discussed in the 'Problem with standards post'.
The B-Format to 5.1 conversion was carried out using some free ware plugins produced by Danielle Courville . This suite of plug-ins is a fantastic resource for anyone working with B-Format content. The plug-in that I had initially identified to carry out this task had a license which subsequently expired and therefore forced me to use these instead. As it turned out this proved to be a happy accident as some of the other plug-ins from the suite will be used further down the line for replay etc. The plug-in used to create the 5.1 stems was the B2G. The plug-in took a little time to get used to in terms of the various output options available. Again some of the problems thrown up by these options will be discussed in the 'Problem with standards post'
B2G Plug-In

Ready to Edit
With all of the audio streams now processed I can now begin the task of editing the video and multiple audio streams in Final Cut Express.
Wednesday, 13 April 2011
Multi-Channel Replay Systems
5.1 versus Ambisonic
This is a brief look at the possibilities and limitations of two systems used to create their own distinct variety of immersive experiences. This follows on from the discussion in this post.
5.1 Replay systems
When mixing dialogue, music and ambience for a traditional 5.1 speaker arrangement, as would be the case for most film, television, radio or game sound, the 'convention' would be to route dialogue to the front or centre speaker, music to the L&R speakers and route any ambient sounds to the rear speakers. This can help with the separation of each distinct element but when it comes down to the creation of an immersive or enveloping soundscape these conventions fall drastically short of being satisfactory.
As we discovered in an earlier post the reliance of phantom images multi-channel replay systems is crucial. Therefore the positioning of the speakers in relation to each other is fundamentally important. The routing of dialogue and ambience to their respective pre-determined locations highlights further the limitations and predicability of these conventional systems.
Ambisonic Replay Systems
If we chose to dispense with the traditional conventions that 5.1 systems adhere and apply the subjective experience to an Ambisonic environment then the opportunities for further envelopment can be realised. With the addition of the periphonic component in the Ambisonic replay system, the extent to which the character's audio environment can be recreated or represented increases greatly. To be able to convey the audio equivalent of a camera looking up and down, and to follow this camera movement from an audio point of view can only add to the true immersion or envelopment, for the viewer, in the experience. Further details on Ambisonic systems can be seen in this post.
Tuesday, 12 April 2011
Ice Climb & Cross Talk Cancellation
Now that the Binaural ice climbing video and audio had been recorded, synced together and edited using various software applications, the Binaural audio needed to be prepared in such a way that it could be played through loudspeakers in stereo and in 5.1.
One of the problems with Binaural recordings is that in order to fully appreciate the perceptual cues offered by the recording technique the audio must be listened to over headphones. While this may be an ideal scenario for individuals listening on the move or at their desk in an an office the perceptual cues that relate to direction etc can be easily lost or confused when being replayed over loudspeakers. This problem is caused by signals intended for one ear only, which is easily achieved through headphones, being received by the other ear. Inevitably this will cause confusion for the listener in respect of directionality and their ability to accurately place a sound source relative to a visual cue.
A system referred to as 'Cross Talk Cancellation' provides a solution to this....to a certain extent. It too suffers from a lack of individualisation for the listener as it is only an approximation of HRTF values. That said the approximation offered by the cross talk cancellation circuit may be equivalent to the differences in HRTF's between listeners listening through headphones. This is an area of research that is ongoing among many academics and it is hoped that through my own research some conclusions may be drawn that can inform or influence some future work.
Cross Talk Cancellation Circuitry
The process of cross talk cancelation or 'transaural' processing is achieved by 'feeding an anti-phase version of the left channel's signal into the right channel and vice versa, filtered and delayed according to the HRTF characteristic representing the cross talk path'. (Rumsey 2001: p 74). This suggests using phase cancellation and addition to prevent signals intended for one ear reaching the other. As mentioned previously the ability of the circuitry to achieve this task is limited by the fact that all potential listeners have varying head and torso shapes and as a result will affect the way in which audio is presented at the ears.
This image demonstrates how cross talk occurs:

This image demonstrates how cancellation circuitry attempts to eliminate the problem:

There is an argument that exists, however, that suggests that our ability to localise sound sources is made simpler when the sound source is accompanied with a visual cue. For example if we see something happening above us and to the right then we would naturally expect the sound source to emit from that direction. Our brain will, to some degree, convince our 'ears' that the sound is in fact coming from that direction. This may go some way to addressing minor inaccuracies brought about by this replay method.
Process
To produce a 'transaural' version of the sound track for the ice climbing sequence a post processing plug-in was inserted across the audio track in Logic. The parameters were set in accordance with the eventual positioning of the loudspeakers (60 degrees) and the audio was then exported.
The plug-in:

5.1
To produce a 5.1 version of the soundtrack the processed binaural (now transaural) audio was brought back into the session and placed on a surround compatible track. The 'Space Designer' plug-in was applied across the track which allowed various parameters to be set. What I wanted to achieve was direct sound emanating from the front speakers with a little reverb coming from the rear speakers to give the illusion of 'space'. The results were quite exaggerated but I feel that this will be appropriate for the research tests as the simulated 5.1 sounds associated with this will offer some further comparisons to be made. The audio stems were 'bounced out' prior to being muxed with the video using DVD studio Pro.
Space Designer Plug:

One of the problems with Binaural recordings is that in order to fully appreciate the perceptual cues offered by the recording technique the audio must be listened to over headphones. While this may be an ideal scenario for individuals listening on the move or at their desk in an an office the perceptual cues that relate to direction etc can be easily lost or confused when being replayed over loudspeakers. This problem is caused by signals intended for one ear only, which is easily achieved through headphones, being received by the other ear. Inevitably this will cause confusion for the listener in respect of directionality and their ability to accurately place a sound source relative to a visual cue.
A system referred to as 'Cross Talk Cancellation' provides a solution to this....to a certain extent. It too suffers from a lack of individualisation for the listener as it is only an approximation of HRTF values. That said the approximation offered by the cross talk cancellation circuit may be equivalent to the differences in HRTF's between listeners listening through headphones. This is an area of research that is ongoing among many academics and it is hoped that through my own research some conclusions may be drawn that can inform or influence some future work.
Cross Talk Cancellation Circuitry
The process of cross talk cancelation or 'transaural' processing is achieved by 'feeding an anti-phase version of the left channel's signal into the right channel and vice versa, filtered and delayed according to the HRTF characteristic representing the cross talk path'. (Rumsey 2001: p 74). This suggests using phase cancellation and addition to prevent signals intended for one ear reaching the other. As mentioned previously the ability of the circuitry to achieve this task is limited by the fact that all potential listeners have varying head and torso shapes and as a result will affect the way in which audio is presented at the ears.
This image demonstrates how cross talk occurs:
This image demonstrates how cancellation circuitry attempts to eliminate the problem:

There is an argument that exists, however, that suggests that our ability to localise sound sources is made simpler when the sound source is accompanied with a visual cue. For example if we see something happening above us and to the right then we would naturally expect the sound source to emit from that direction. Our brain will, to some degree, convince our 'ears' that the sound is in fact coming from that direction. This may go some way to addressing minor inaccuracies brought about by this replay method.
Process
To produce a 'transaural' version of the sound track for the ice climbing sequence a post processing plug-in was inserted across the audio track in Logic. The parameters were set in accordance with the eventual positioning of the loudspeakers (60 degrees) and the audio was then exported.
The plug-in:

5.1
To produce a 5.1 version of the soundtrack the processed binaural (now transaural) audio was brought back into the session and placed on a surround compatible track. The 'Space Designer' plug-in was applied across the track which allowed various parameters to be set. What I wanted to achieve was direct sound emanating from the front speakers with a little reverb coming from the rear speakers to give the illusion of 'space'. The results were quite exaggerated but I feel that this will be appropriate for the research tests as the simulated 5.1 sounds associated with this will offer some further comparisons to be made. The audio stems were 'bounced out' prior to being muxed with the video using DVD studio Pro.
Space Designer Plug:

Monday, 11 April 2011
Ice Climb
As part of the pre production for the Honours Project I had intended on carrying out a B-format recording of an ice climb, again in the Scottish mountains. To prepare for this I had taken the GoPro helmet camera and binaural recording set up along on a climb in January. I then realised that with the additional weight of the rucksack containing the b-format recording gear it would be too much work getting it to the climb. Most climbs in Scotland require a 2 hour walk with a full pack of climbing equipment. I would either need to recruit another person to transport the gear or think of an alternative solution for the project. I decided on the latter.
Instead of a B-Format recording I would concentrate on a binaural only recording. This would be ideal for the research required for the the dissertation, where I would be using various formats of soundtracks to gauge whether the viewer felt 'immersed' or part of the action. The binaural recording could be played through loudspeakers, where it should technically not give the same perceptual cues, possibly being reflected in the research findings. It could also be played to a different test group, this time using head phones, whereby an effective comparison could be made.
This idea of the comparison between loudspeakers and headphones resulted in me changing my mind with regard to the location in which the recording would take place. I had already shown that it was possible to carry out b-format recordings of two different sports in two very challenging outdoor environments, which was an area that I had chosen to investigate as part of my research. I now had the opportunity to focus the research in a very different way. This time I would carry out the recording indoors at an ice climbing wall. This allowed me to factor in the possibility of other people being present, contributing to the directional nature of some of the sounds and being in a relativity small environment I had a good idea of how it would sound.
Ice Factor Kinlochleven:

In this short clip the binaural audio clearly gives a sense of directional cues and ambient cues when I listen back over headphones. The research should determine if the technique will work on those listeners that have a different head shape than my own. I am interested to find out if the participants in the study have similar or very different experiences when viewing this sequence. There are a few other climbers present. The main voice that can be heard is that of the an instructor commenting on the section of ice that I am climbing.
Put on some headphones and listen for the ice hitting the helmet of the climber and listen to the position of the axes and crampons.
Ice climbing sequence
Ice Climbing Binaural from Colin Gunning on Vimeo.
Sunday, 10 April 2011
Final Motorbike Session
As the snowboard session had gone so well I was now confident that the microphone with the foam padding would cope equally as well with the motorbike. Rather than the motorbike rider wearing the rucksack mounted microphone, the mic would be mounted on the rear of the bike behind the rider. There were several reasons for the choice of mic placement. The first reason was to get the microphone as close to the part of the bike that makes the most noise...in this case the exhaust. Secondly, after discussions with the rider, it was decided that positioning it directly behind would expose it to the least amount of wind noise when the bike was traveling.
The microphone was placed inside a foam 'shoe' which acted as a secondary shock mount between the vibrating rear of the bike and the windshield. The mic and 'shoe' were then attached to the bike using bungee chords. The recorder, mic pre amp and power supply were placed inside the same foam housing that was made for the rucksack. This foam housing was then placed inside a 'tank bag' in front of the rider. (A 'tank bag' is a suitcase that is magnetically attached to the fuel tank of the bike).
Here are some pictures of the set up:
The resultant recordings were very clean and clear. Similar to the snowboard session there is some evidence of wind causing minor problems but these can be filtered out during post-production. The presence of the wind is also a true reflection of what it is like being on a motorbike. These recordings are, after all, supposed to give the viewer a sense of really being on the bike and with all of the rattles from the chain, sounds from the gear selector, wind noise etc this should add to that experience.
Just like in previous sessions monitoring of the audio during the recording was impossible. Levels were checked prior to the journey using headphones and visually. This proved adequate but in a bigger production monitoring of audio prior to the journey would be possible with the use of mobile recording vehicles etc.
Here is a short example of the bike sequence. The audio in the clip is a Mid-Side decode of the B-Format audio.
Final Snowboard Session
With the issues surrounding the microphone noise apparently addressed it was time to get back out onto the mountain with the snowboard and onto the road with the bike. First up was the snowboard session. This time on the mountain the weather was completely different from the blue skies and windless day that had greeted us previously. 60 mph gusts of wind and low cloud made riding and recording conditions extremely difficult. The spindrift (snow whipped around by wind) was getting everywhere and made visibility difficult. These conditions, although testing, would hopefully add some exiting atmosphere to the recordings as well as give the viewer a sense of how harsh it can be on Scottish mountains.
This short video shows the microphone mounted on the rucksack...wind and spindrift
Despite the high winds the construction of the microphone and Rycote windshield coped with ease. There was evidence in the final recording of extremely high gusts of wind displacing the diaphragm but only in a few instances. The resultant recordings from the snowboard session were really clean an clear with very little evidence of the problems encountered previously. The foam padding inside the shock mount and windshield had done its job.
The binaural microphone set up had also coped extremely well with the conditions. Being pressure sensitive microphones they can typically cope with frequencies down to as low as 20Hz. Similar microphone capsules are used in lavalier or 'tie clip' microphones used for recording speech, for example, in an interview situation where plosives can be troublesome due to the proximity of the microphone to the mouth.
Having managed to successfully capture b-format and binaural audio the snowboard material could go forward to the post-production stages. These stages will be discussed in greater detail in subsequent posts.
Here is a short example of the final snowboard sequences...
Clip 1 is a binaural recording. This is a little more susceptible to the wind noise due to the lack of protection, however, the periphony offered is better than the M-S recording in clip 2. Some filtering of frequencies below 100Hz was applied to counter the strong winds
Clip 1 - Binaural
Clip 2 Mid-Side derived from the B-format audio.
This short video shows the microphone mounted on the rucksack...wind and spindrift
Untitled from Colin Gunning on Vimeo.
Despite the high winds the construction of the microphone and Rycote windshield coped with ease. There was evidence in the final recording of extremely high gusts of wind displacing the diaphragm but only in a few instances. The resultant recordings from the snowboard session were really clean an clear with very little evidence of the problems encountered previously. The foam padding inside the shock mount and windshield had done its job.
The binaural microphone set up had also coped extremely well with the conditions. Being pressure sensitive microphones they can typically cope with frequencies down to as low as 20Hz. Similar microphone capsules are used in lavalier or 'tie clip' microphones used for recording speech, for example, in an interview situation where plosives can be troublesome due to the proximity of the microphone to the mouth.
Having managed to successfully capture b-format and binaural audio the snowboard material could go forward to the post-production stages. These stages will be discussed in greater detail in subsequent posts.
Here is a short example of the final snowboard sequences...
Clip 1 is a binaural recording. This is a little more susceptible to the wind noise due to the lack of protection, however, the periphony offered is better than the M-S recording in clip 2. Some filtering of frequencies below 100Hz was applied to counter the strong winds
Clip 1 - Binaural
Untitled from Colin Gunning on Vimeo.
Clip 2 Mid-Side derived from the B-format audio.
Untitled from Colin Gunning on Vimeo.
Saturday, 9 April 2011
Microphone solution
As discussed in the previous post the b-format audio that accompanied the snowboard and motorbike video sequences was not of good enough quality to use due to the extraneous noise caused by the mic hitting off the side of the windshield.
To address this issue I needed to be able to pack down the mic in such a way that it would not pick up vibrations from the bike or board or have a detrimental effect on the mics ability to capture sound. The reason that microphones are mounted in shock mounts is to avoid bumps and thumps caused by knocks etc. So to pack the mic against the windshield, in theory, almost defeats the purpose. I had to experiment with some materials and settled for strips of foam that were left over from the construction of the rucksack recorder housing. I carried out some test recordings by jumping from stairs etc and found that this would be a suitable solution.
Here are some pictures that demonstrate the results:
Friday, 8 April 2011
Out on the mountain
After some successful trial recordings using both binaural and b-format techniques it was time to put all the theories into practice. I went out for the day accompanied by another snowboarder to Glencoe Mountain to capture some video and audio footage. The backpack recording system which contained the b-format recording gear, and the portable digital stereo recorder used for the binaural microphones were used along side the GoPro helmet camera.
The following slide show documents the equipment used on the day:
One of the major challenges of field recording is being able (or not being able as is the case most of the time) to monitor audio effectively. To do this in the field one would normally use headphones but as my ears were being used to house the binaural microphones this was not an option for the entire duration of the recording. Instead I had to set levels by eye on the recorders and trust my judgments based on previous recordings that I had made. The first opportunity I had to check whether the recordings were satisfactory was in the car at the end of the day using a laptop. Even then it wasn't until the recordings were heard through studio monitors that proper judgments could be made.
On listening back to the recordings through a 5.1 system it became apparent that there was a continual 'thump' and 'banging' sound audible throughout the b-format recording. I was not aware at the time that this was the case and decided to try to fix this using the spectral analysis tool in the Adobe Audition software. The spectral analysis was showing a broad range of problematic frequencies which would prove to be too difficult and time consuming to eliminate. The images below indicate excessive peaks in the audio. These peaks are also the deep red areas on the spectral analysis tool.

Despite the fact that the video footage was really bright thanks to a glorious day on the mountain I would need to return to get the recordings that were required.
That weekend I also recorded some motorbike footage and audio. The problems with the mic noise were evident there also. After listening to both sessions I had to establish what the problem was. It transpired that the microphone was knocking against the side of the rycote windshield. The microphone is mounted inside a shockmount and the shockmount is placed inside the windshield. After connecting the recording system to the studio playback monitors and shaking the microphone as hard as I could I discovered what the problem was. Although I had spent two days recording without producing any successful results I had managed to discover what the problem was and take steps to address it. I shall discuss this process in my next blog post.
The videos below demonstrate the problematic noises in the b-format recordings. The audio examples that accompany the footage were mixed using the Mid-Side decoding technique discussed in previous posts.
Untitled from Colin Gunning on Vimeo.
Untitled from Colin Gunning on Vimeo.
Wednesday, 6 April 2011
Trial B-Format recordings
Now that the recorder and microphone are ready to go I decided to test out the setup in some controlled environments. I was lucky enough to be in Inveraray at the end of January visiting the George hotel. At the hotel, on holiday, was a 30 strong student choir from Trondheim in Norway. They performed 4 or 5 pieces of music in the busy public bar. I had obtained permission to record them and here are the results:
Candiss Wont you come home Bill Bailey by seegee
Candiss outro by seegee
The b-format recordings were transferred into Pro Tools in order that they could be edited and mixed. To listen to any b-format recording we must first 'decode' the signals to suit the monitoring configuration. In this case stereo. This can be done in several ways but the most effective, and flexible decoding method is achieved by utilising the (W) & (Y) channels to obtain Middle and Side, or Sum and Difference. The (W) or Omnidirectional channel is used as a reference and is panned to the centre. The (Y) or left/right facing Figure of Eight channel is panned to the left giving us M+S=L. A duplicate is made of the (Y) channel, phase inverted, then panned to the right giving us M-S=R. To vary the apparent width of the recording we simply vary the amount of Middle to Side which in turn causes various amounts of phase addition and cancellation.
Below is a diagram showing how the microphone capsules work together to provide spatial information.

Below are the screen shots of the mix and edit windows showing the waveforms and the mixer settings.


The next stage of the process is to listen to the b-format recordings through a 5.1 monitoring system. This time the files were imported into Logic and a 'plug-in' was inserted across the track which routes the appropriate combination of signals to the appropriate speakers. As we discovered in an earlier post, b-format recordings differ greatly from traditional stereo or multi-channel techniques, because they do not rely on a specific number of speakers to replay what has been recorded. As a result of this there are a few products on the market that enable us to take advantage of b-format recordings coupled with 5.1 speaker set-ups. Two of these products were tested out yielding incredibly satisfactory results.
The product that I shall be using for the generation of 5.1 is the Soundfield surround zone plug-in. As we can see from the image below the plug-in allows us to route b-format signals to a variety of speaker configurations. During the listening tests I noted that it was very difficult to pinpoint the speaker positions which can often be the case when employing other spatial microphone recording techniques....this is exactly what I had hoped. I will discuss this in more detail in a later post.

The 5.1 recordings of the examples above have been included on the DVD that accompanies this blog.
The references for the images used have been detailed in the accompanying documentation.
Candiss Wont you come home Bill Bailey by seegee
Candiss outro by seegee
The b-format recordings were transferred into Pro Tools in order that they could be edited and mixed. To listen to any b-format recording we must first 'decode' the signals to suit the monitoring configuration. In this case stereo. This can be done in several ways but the most effective, and flexible decoding method is achieved by utilising the (W) & (Y) channels to obtain Middle and Side, or Sum and Difference. The (W) or Omnidirectional channel is used as a reference and is panned to the centre. The (Y) or left/right facing Figure of Eight channel is panned to the left giving us M+S=L. A duplicate is made of the (Y) channel, phase inverted, then panned to the right giving us M-S=R. To vary the apparent width of the recording we simply vary the amount of Middle to Side which in turn causes various amounts of phase addition and cancellation.
Below is a diagram showing how the microphone capsules work together to provide spatial information.
Below are the screen shots of the mix and edit windows showing the waveforms and the mixer settings.


The next stage of the process is to listen to the b-format recordings through a 5.1 monitoring system. This time the files were imported into Logic and a 'plug-in' was inserted across the track which routes the appropriate combination of signals to the appropriate speakers. As we discovered in an earlier post, b-format recordings differ greatly from traditional stereo or multi-channel techniques, because they do not rely on a specific number of speakers to replay what has been recorded. As a result of this there are a few products on the market that enable us to take advantage of b-format recordings coupled with 5.1 speaker set-ups. Two of these products were tested out yielding incredibly satisfactory results.
The product that I shall be using for the generation of 5.1 is the Soundfield surround zone plug-in. As we can see from the image below the plug-in allows us to route b-format signals to a variety of speaker configurations. During the listening tests I noted that it was very difficult to pinpoint the speaker positions which can often be the case when employing other spatial microphone recording techniques....this is exactly what I had hoped. I will discuss this in more detail in a later post.
The 5.1 recordings of the examples above have been included on the DVD that accompanies this blog.
The references for the images used have been detailed in the accompanying documentation.
Tuesday, 5 April 2011
Construction of location recording equipment
One of the major challenges of any form of multi-channel or surround location recording is the amount of equipment that is typically required. Through the preparatory work carried out in the Pre-Production and Concept Development modules, I had already identified what would be practicable, although I had yet to actually put it into practice. I needed to be able to record video, binaural audio and multi-channel audio whilst at the same time snowboard, climb, ride a motorcycle etc. This, in anyone's book, would be a significant challenge.
The recording equipment required for the project needed to be sourced and put together. To carry out this recording and video process I needed to ensure that the equipment could be transported easily and carried by a snowboarder, climber or motorcyclist. The equipment also needed to be secure and be easily operated by a user. To solve this the recorder, microphone power supply and interface was mounted in foam and placed inside a rucksack. The foam could be easily removed from the rucksack giving access to the controls. A frame capable of supporting the microphone had to be constructed and mounted to the rucksack. The frame was constructed from light weight steel tubing and parts of a microphone stand. The mic was mounted to the stand and was able to be adjusted in terms of height and direction.
The images on flikr should give an idea of how this process was carried out.
note: flickr will open in a new window
The image below is a Soundfield ST350 microphone

More images and a description of the process can be found here
The video was to be captured using a GoPro helmet mounted point of view camera.

The binaural audio would be captured using Soundman OKM11 microphones and a portable digital stereo recorder.

Recording examples will follow in subsequent posts.
Saturday, 2 April 2011
Introduction to Binaural Recording
The second technique that I intend to use to capture 3 dimensional spatial audio is Binaurally.
Similar to the 'Introduction to Ambisonics' post I do not intend to discuss in great detail how this technique works but feel that it is necessary to provide some context.
The binaural recording technique relies on intensity differences and time of arrival differences of sound reaching the ear drums to enable accurate localisation of a sound source. Spectral filtering or head related transfer functions (HRTF's) caused by the pinnae also contribute significantly to the ability of the human brain to position sound sources above and below the azimuth plane.
Binaural recordings are usually carried out using a 'dummy head'. This dummy head is equipped with two omnidirectional microphones placed inside the ear canal which aim to mimic the ear drum. The effects of the shape of the head and pinnae, on the sounds reaching each microphone, contribute to its ability to accurately reproduce the spatial characteristics of the environment in which the recording is taking place. In order to listen back to, and appreciate fully the spatial cues offered by the technique, it is necessary to listen over headphones or through a loudspeaker system equipped with cross talk cancellation software. This technique lends itself well to recorded sound intended for the mobile entertainment market where most if not all users would be using headphones.
The most common piece of professional apparatus used to capture binaural recordings is the Neumann KU100. Although for my particular project it is not entirely portable therefore not practicable to use anything similar.

Instead, as I have previously discussed in my Concept Development blog, I have opted to use a pair of ear canal mounted omnidirectional microphones to achieve the same effect. At a fraction of the cost of the KU100 these microphones may not offer the same microphone capsule quality but through extensive field testing, can provide exceptionally convincing results.

It can be argued that binaural recordings are only effective when the listeners head closely matches that of the head that was used to capture the sound in the first place. Problems can arise resulting in a listener being unable to discern the position of sound sources that lie directly in front. These sound sources can often be heard 'inside the head' of the listener.
There are several other manufacturers and companies that have realised the potential that this technique can offer. As a result many 'interesting' devices are beginning to appear on the market. These devices may become commonplace, potentially overtaking traditional stereo formats as the demand from consumers for 3 dimensional audio increases.
This is a device from Japanese company Otokinoko
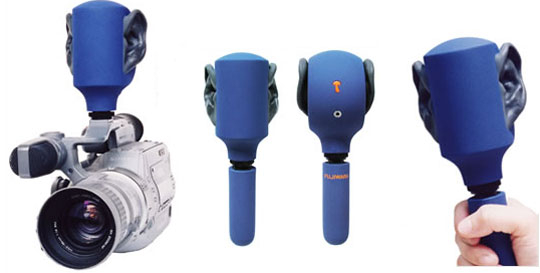
Similar to the 'Introduction to Ambisonics' post I do not intend to discuss in great detail how this technique works but feel that it is necessary to provide some context.
The binaural recording technique relies on intensity differences and time of arrival differences of sound reaching the ear drums to enable accurate localisation of a sound source. Spectral filtering or head related transfer functions (HRTF's) caused by the pinnae also contribute significantly to the ability of the human brain to position sound sources above and below the azimuth plane.
Binaural recordings are usually carried out using a 'dummy head'. This dummy head is equipped with two omnidirectional microphones placed inside the ear canal which aim to mimic the ear drum. The effects of the shape of the head and pinnae, on the sounds reaching each microphone, contribute to its ability to accurately reproduce the spatial characteristics of the environment in which the recording is taking place. In order to listen back to, and appreciate fully the spatial cues offered by the technique, it is necessary to listen over headphones or through a loudspeaker system equipped with cross talk cancellation software. This technique lends itself well to recorded sound intended for the mobile entertainment market where most if not all users would be using headphones.
The most common piece of professional apparatus used to capture binaural recordings is the Neumann KU100. Although for my particular project it is not entirely portable therefore not practicable to use anything similar.
Instead, as I have previously discussed in my Concept Development blog, I have opted to use a pair of ear canal mounted omnidirectional microphones to achieve the same effect. At a fraction of the cost of the KU100 these microphones may not offer the same microphone capsule quality but through extensive field testing, can provide exceptionally convincing results.
It can be argued that binaural recordings are only effective when the listeners head closely matches that of the head that was used to capture the sound in the first place. Problems can arise resulting in a listener being unable to discern the position of sound sources that lie directly in front. These sound sources can often be heard 'inside the head' of the listener.
There are several other manufacturers and companies that have realised the potential that this technique can offer. As a result many 'interesting' devices are beginning to appear on the market. These devices may become commonplace, potentially overtaking traditional stereo formats as the demand from consumers for 3 dimensional audio increases.
This is a device from Japanese company Otokinoko
Dolby and pseudo surround for headphones
The ideas surrounding immersive audio experiences has been around for some time and with the advancements in technology surrounding Binaural recording there is real scope for employing these techniques, particularly in the field of mobile entertainment. The technique is fairly simple to perform as it requires only two transducers and a stereo recorder.
This recording method could be adopted by creators of mobile media for a diverse range of application including the obvious ones such as game, music, film but could prove equally as useful for news, podcasts, mobile phone applications such as city guides or anything that could benefit from giving the user more than just visual information but sonic stimuli also. An App for a restaurant, for example, could convey the sonic atmosphere to accompany visual images such as pictures of diners, menus or of the chef working in the kitchen. Surely an audio picture is just as important as a visual one when trying to sell an experience.
Companies such as Dolby, that have traditionally led the way in multi-channel surround using loudspeakers, are beginning to see the benefits of surround on the move and are coming very close to providing satisfactory surround experiences over headphones. They are, however, adopting very different approaches than the ones used to create Binaural experiences. These pseudo surround systems claim to give the mobile/headphone user a similar experience to the one offered by their home theater system. The technology that Dolby Labs is employing is no different to that used in studios to 'widen' stereo images etc. By various combinations, additions, subtractions and filtering of phase, similar effects to those offered by Binaural technologies can be achieved.
When Dolby Labs are producing equipment like this then you can safely assume that there is sufficient market demand for the products. It's whether or not the technology on offer is enough satisfy that demand still remains to be seen.
Here is the Dolby Mobile Solution:
Dolby - Dolby Mobile Demo
And a description of how it works here:
From Youtube:
Friday, 1 April 2011
Introduction to Ambisonics and B-Format
As it is my intention to capture and reproduce audio in such a way that the listener is able to perceive sound as if being present at the time of recording, it is necessary to provide a brief introduction to the methods that I shall be employing.
A comprehensive description of the technology associated with this approach has been included in my Dissertation literature review and in the supporting documentation for the Honours Project Module. I will therefore give only a brief outline of how this technology works.
Ambisonics, devised by Gerzon, Fellget, Cooper et al, aims to reproduce spatial audio including height or 'periphony'. Traditional forms of spatial reproduction had no means of capturing periphonic information. Ambisonics however, expanded on the work of Alan Blumlein by adding an omnidirectional microphone and a third figure of eight microphone to Blumlein's pair of figure of eight microphones used for capturing stereo images.
Blumlein's pair

With the addition of an omnidirectional and third figure of eight capsule we now have the ability to capture periphonic information.

The WXYZ relationship is described further by this diagram where W acts as a reference for XY&Z:
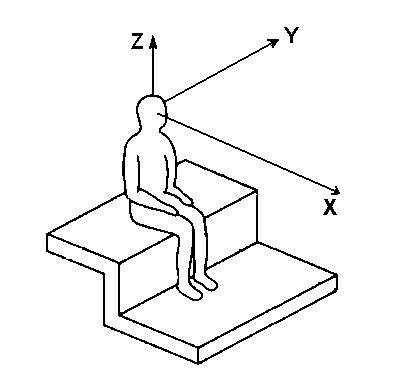
As both techniques rely on phase relationships between the relative capsules, both therefore rely on the 'coincidence' of the microphone capsules to each other. If there are any phase discrepancies introduced by the spacing of the microphone capsules then the mathematical assumptions upon which these techniques are based cannot be realised. As it is impossible for any two microphone capsules to occupy the same space then there are bound to be phase inaccuracies, which in turn will skew the resultant stereo image. The manufacturers of the Soundfield microphone have got round this problem by calculating the impact that audio has on a sphere. As the relationship between the surface of a sphere and its centre can be clearly defined the calculations necessary to 'virtually' put the sound sources at the centre of a sphere can be carried out.
The resultant outputs from the four microphone capsules produce what is known as B-format audio. This four channel format relies on various combinations of sum and difference of microphone signal phase to replicate spatial information. These signals can then be directed to any number of loudspeakers, where soundfields or wavefronts, corresponding to those created at the recording stage, are reproduced.
The advantages of Ambisonics and B-format over traditional spatial techniques are; the ability to capture and reproduce periphonic information, not needing to rely on any single playback system and the flexibility of what can be achieved by 4 channels of audio in terms of output configurations.
A comprehensive description of the technology associated with this approach has been included in my Dissertation literature review and in the supporting documentation for the Honours Project Module. I will therefore give only a brief outline of how this technology works.
Ambisonics, devised by Gerzon, Fellget, Cooper et al, aims to reproduce spatial audio including height or 'periphony'. Traditional forms of spatial reproduction had no means of capturing periphonic information. Ambisonics however, expanded on the work of Alan Blumlein by adding an omnidirectional microphone and a third figure of eight microphone to Blumlein's pair of figure of eight microphones used for capturing stereo images.
Blumlein's pair
With the addition of an omnidirectional and third figure of eight capsule we now have the ability to capture periphonic information.
The WXYZ relationship is described further by this diagram where W acts as a reference for XY&Z:
As both techniques rely on phase relationships between the relative capsules, both therefore rely on the 'coincidence' of the microphone capsules to each other. If there are any phase discrepancies introduced by the spacing of the microphone capsules then the mathematical assumptions upon which these techniques are based cannot be realised. As it is impossible for any two microphone capsules to occupy the same space then there are bound to be phase inaccuracies, which in turn will skew the resultant stereo image. The manufacturers of the Soundfield microphone have got round this problem by calculating the impact that audio has on a sphere. As the relationship between the surface of a sphere and its centre can be clearly defined the calculations necessary to 'virtually' put the sound sources at the centre of a sphere can be carried out.
The resultant outputs from the four microphone capsules produce what is known as B-format audio. This four channel format relies on various combinations of sum and difference of microphone signal phase to replicate spatial information. These signals can then be directed to any number of loudspeakers, where soundfields or wavefronts, corresponding to those created at the recording stage, are reproduced.
The advantages of Ambisonics and B-format over traditional spatial techniques are; the ability to capture and reproduce periphonic information, not needing to rely on any single playback system and the flexibility of what can be achieved by 4 channels of audio in terms of output configurations.
Wednesday, 30 March 2011
Dolby Pro Logic 11Z
Dolby 'With Height'
Dolby Labs have relatively recently introduced a new system called Dolby Pro Logic 11Z which is different to other Dolby systems in that it has the potential to add an additional 4 speakers that claim to add height to the listening experience. The system claims to work by 'identifying and decoding spatial cues that occur naturally in all content' (online) and directing this to the speakers above. Whether this adds any true height to a recording or just plays sound from 'higher up' I have yet to be convinced.
If we chose to put aside any argument for or against this technology, we can see yet again that companies that have been revolutionary, in relation to they way we experience audio in theaters or at at home, are recognising that planar formats are just not good enough when it comes to immersing the viewer. This can only be advantageous for creators of Ambisonic content. As companies like Dolby encourage people to put more speakers into their homes, by adding to existing surround systems or through new purchases, then that may be the in-road for Ambisonics in the home. As consumers will have a sufficient number of loudspeakers the potential for this becomes even greater. All that would need to happen next would be the agreement of a standard for transmission, suitable commercially available decoders and someone with the foresight to make this happen. I don't think that we will be too far off....
Here is the Dolby system in action
Dolby Pro Logic IIz - Video Demo - dolby.co.uk
Or from Youtube:
Tuesday, 29 March 2011
What is Immersion?
Spaciousness versus 'Immersion'
This is an extract from my dissertation literature review which explores the differences between spaciousness and what this project will term 'immersion'. This definition of immersion will be used to underpin the primary aim of the project, therefore it is crucial that the reader is able to understand the proposed distinctions between spaciousness and true immersion. This review will also allow me to successfully define the scope and context of the project. It is also important that I use this information to set my own boundaries to keep the project focused.
Extract:
The primary difference between conventional techniques where the surround channels are used for cues to provide 'spaciousness', and the techniques for creating an immersive audio environment, is how the audio is captured and presented. There are several methods for capturing and replaying multi-channel audio that provide spaciousness but fewer that are capable of creating a sense of true immersion. We can use a combination of techniques that allow traditional methods to create a sense of immersion and as this project seeks to determine if methods such as Binaural and Ambisonic approaches can provide that to a greater degree compared with traditional approaches, it is important to discuss the context for which these techniques are intended.
According to Holman, 'spaciousness applies to the extent of the space being portrayed, and can be heard over a 2-channel or 5-channel system' (2000: p.216). In practice it is possible to determine the size or extent of a location in which a recording took place by the reverberation or diffuse field characteristics that accompany the direct sound. The ability of a 2-channel system to reproduce this is limited by the fact that the image itself can only exist between the two loudspeakers. The image that appears between any two loudspeakers is referred to as the phantom image. Although the space can be imagined and represented by the phantom image there is little chance of a listener thinking that they are present in that space if only two loudspeakers are employed. He then goes on to say that 'envelopment...applies to the sensation of being surrounded by sound, and thus being incorporated into the space of the recording' (2000: p.216). This envelopment does require the use of at least a multi-channel reproduction system to create this sensation. With multiple speakers and multiple phantom images created between each source the listener can begin to imagine the sound field that the system aims to represent.
Holman's concepts of the "Direct/Ambient" approach where the front two loudspeakers provide the direct sound and the spaciousness is conveyed through the rear channels, and the "inside the band" approach, where direct sound and ambient sound do not follow these conventions as a result of direct and ambient sound being played through any loudspeaker, determine the audio perspective that the viewer is offered (2000: p.102). When viewing a visual sequence it is important that the audio picture supports the narrative conveyed through the visual picture by creating a sense of continuity between the two, unless of course the sound designer or director is trying to juxtapose the two to create an entirely different narrative. The sense of direct involvement can only come about if the viewer is experiencing the sound that the image suggests, i.e. from the perspective offered by the camera angle. Chion uses the term 'spatial and subjective point of audition' to make the distinction between the possibilities offered by camera angles and audio perspectives. He refers to the spatial designation as 'the place from which I the spectator see; from what spatial location the scene is presented' and the subjective designation as the character's point of view as seen by the spectator (1994: p.89). Understanding these distinctions is crucial for the sound designer to successfully fuse the two entities and create a true sense of envelopment.
In the case of the audio and visual examples provided within the context of this research the perspective falls into the subjective category as the camera angle is providing the viewer with the character's point of view. It is also hoped that when the ‘inside the band’ soundtrack accompanies the visual sequence, the viewer will 'become' the character by seeing what s/he sees and hearing what s/he hears.
End
So what can we take from this extract? Immersion, within the scope of this project means envelopment, being surrounded by sound, and with that comes the possibility of audio functioning as a tool that helps to involve the viewer in an experience.
To establish if there is any real benefits of immersion over spaciousness then this project will need to produce films and soundtracks using the techniques outlined above as a means of finding this out. Further research into similar technologies aimed at providing such experiences will need to be explored and further exploration of techniques and processes will need to be carried out.
Welcome
Thank you for taking the time to view this blog.
The blog entries will discuss in detail the creative processes that I have undertaken in order to produce media artifacts that will help answer my specific research question.
‘Compared with stereo and multi-channel spatial recording and reproduction techniques, determine if binaural and Ambisonic techniques can produce a greater degree of immersion in an audiovisual experience.’
Through the process of critically evaluating different aesthetic frameworks, creative decisions will be taken which in turn will help to refine and focus the investigation. Ideas relating to the contextual dimensions of the project will also be expressed through the blog giving the reader a clear understanding of how the creative processes, or findings from research, may be applied in either future research or in the practices of others.
Considerations relating to the conceptualisation and realisation of the project, including challenges, will be discussed and documented.
I would also like to encourage any reader of this blog to comment on any aspect of the process as a crucial aspect of this module is the refinement of ideas in response to the thoughts of others.
Subscribe to:
Posts (Atom)